Welcome to www.abooking.com. You can register your vacation property for free. There are no cost to use abooking.com but we take a minor fee of 10% of each booking made through ab0oking.com. There are no cost until you have someone renting your property.
It is quick and easy to register your vacation house, cottage, apartment etc. at www.abooking.com. This guide will aid you in the process to register your vacation object. You can at any time contact our support team if you need any help, you will find contact information under “Contact us”.
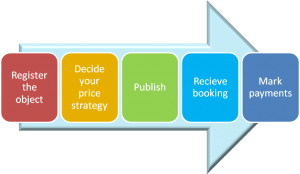
- Register the object at www.abooking.com
- Decide your price strategy
- Publich your vacation object
- Receive the bookings
- Mark payments in the booking calendar
Prerequsites
To being able to start the vacation property registration you need to have a personal account at www.abooking.com. Just follow the steps below to create an account
Create a personal account
Start by visit the www.abooking.com and select “REGISTER ACCOUNT”, the personal registration page is displayed, see picture below.
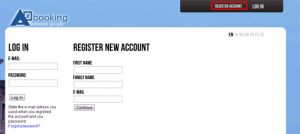
Start the registration by stating your
- FIRST NAME e.g. “John” and thereafter the
- FAMILY NAME e.g. “Smith” then enter a valid
- e-mail address in the E-MAIL field. The e-mail address is needed for two purposes.
3.a Used as the unique identifier for your account
3.b Used to send a link so you can complete the registration.
When you stated the correct information click on [Continue].
NB: A mail will be sent to you so you can complete the registration. If you can´t find the mail check the Junk e-mail folder.
When you received the mail from Abooking, click on the link and complete your registration, see example below. Fields marked with red star are mandatory to complete. If you have a company, you can register the name and registration no.
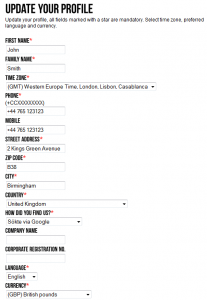
Click “Save” or “update” thereafter the Welcome Page is displayed.
Register a new object
First some information regarding the navigation
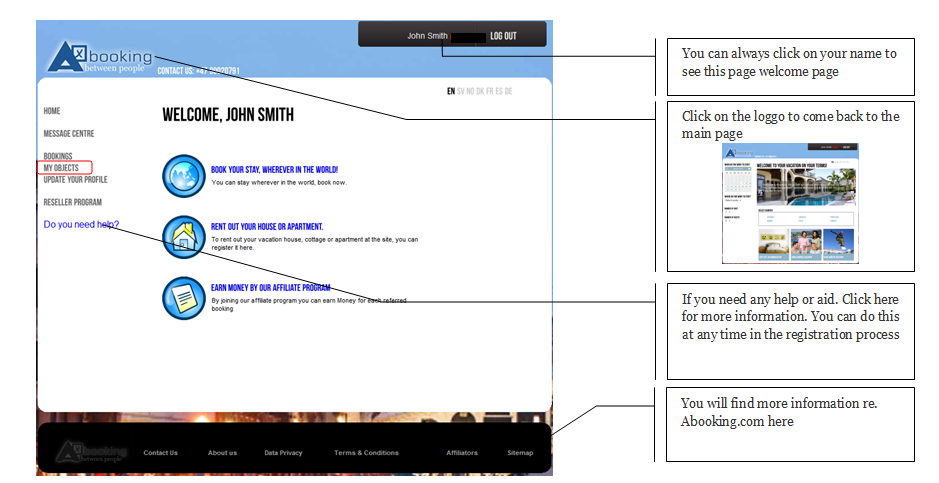
Start the registration process
To register a vacation object, select ”MY OBJECTS” in the left hand menu.

1. Select “REGISTER NEW OBJECT” to start the registration process and the Object Registration Page is displayed.
2. Select HOUSE for vacation house, cottage, villas etc. or APARTMENT – select the best alternative for your vacation object

1a. NAME
You can now start with giving your object a name. The name will be published and displayed for the potential guests.
Example: “Charming vacation house at South France”, “The Cottage”, “The Beachhouse”
Good to know: There can be several object with the same name since it is the e-mail address which is the unique identifier. The object is then related to the account used when the vacation object is created.
When you have given the vacation property a suitable name, then click [CREATE]

2a. LOCALISATION
When the name is succsessfully saved you need to state the object´s location.
From the drop down menues
- Select “COUNTRY”
- Select “COUNTRY/STATE”
- Select“CITY”
NB: if the “COUNTRY/STATE” and/or “CITY” are not available in the list, you can state the correct inforamtion and it will be saved.

2b. LOCALISATION
When the “COUNTRY”, COUNTRY/STATE” and “CITY” section is saved you are requested to state the full address of the property. The address will be used to place a pin at the map so it will be easy for the guest to find the way to the object.
TIPS: start with stating the country and it will be easier for the tool to find your address and place the pin. If you type slowly you will be suggested addresses and you can select the correct one.
Example: Sweden, Vacation street 12
NB: If Abooking can’t find your address, state an address as close as possible and “drag and drop” the pin to the correct location. Also ensure that you state the correct address in the “INFORMATION” field (to be complated in next step). Please note that you are responsible to state the correct address.
Verify that the marker is correct. You can drag and drop the marker to adjust the position.
When read, Click “Continue” to go to next page.
3. INFORMATION
In this section you will give inforamtion about your vacation object. There are several sections to complete; 1.NAME 2.LOCALISATION 3.INFORMATION 4.PICTURES 5.GUEST & PRICES and 6.DESCRIPTION. Take you time and go through each subsections one by one. Ensure that the information you state meet the reality of the object. You are responsible to give correct information about your vacation object. You can update this information at any time to ensure that the information match any changed conditions.
NB: Some alternatives are marked with a red star “*”, this means that you must select one of the available alternatives or that you must state some information. Completed sections and subsection are marked with a green tickmark “√”.
TIPS: You can always navigate between the different sections by clicking directly at the menues i.e. 1.NAME 2.LOCALISATION 3.INFORMATION 4.PICTURES 5.GUEST & PRICES and 6.DESCRIPTION
3a. DETAILS

- Type of staying
Select if any food included - House Type
Select best alternative - Living Area
Write the size of the object - Construction Material
Select the best alternative - Insulation
Is the object insulated for Winter or only summer? - Build Year
Write the year when it was built - Renovated
If the object has been renovated you can state the year here - House Plot
Select the best alternative - Plot Size
Write the size of the plot - Meters over sea
State the altitude

- Terrace
Select the best alternative - Terrace size
Write the size e.g. 20 - Parking
Select the best alternative - Pets Allowed
Yes = Pets are welcome
No = Pets are not allowed - Smoke-Free
Yes = Smoking is not allowed
No=Smoking is OK - Heating/Cooling
Select the best alternative - Stove/Fire Place
Select the best alternative - Floor Heating
Select the best alternative - WC (Toilet)
Select the best alternative - Number of WC
State how many toilets are available e.g. 1 - Handicap accessible
Yes = Easy for wheelchairs
No = property has stairs and steps, not good for disabled persons
When completed the section click “Save” and the Details are completed, next step is Distance

3b. DISTANCE
NB: Some alternatives are marked with a red star “*”, this means that you must select one of the available alternatives or that you must state some information. the other fields are optional to state.
TIPS: If the field require KM and the distance is 200 meters, then state 0.2


- To busy road in meter
How fare from traffic sounds e.g. 100 - To Neighbors in meter
How far to next house e.g. 50 - To Snow cleaned road in meter
Are there any risks that the guest need to shuffle out their car? How far to a drivable road e.g. 10 - To Parking Space in meter
How fare to the nearest place to park the car e.g. 10 - To Centrum in KM
How far to the city/village centre e.g 2 - To nearest Town/City in KM
How far to the city e.g. 20 - To nearest Restaurant in KM
How far to the restaurant e.g. 0.2 - To Nearest Tourist information in KM
How far to the Tourist info. e.g 2 - To nearest Bank & Post office in KM
How far to the bank/post. e.g 2 - To nearest shops in KM
How far to the shop. e.g 2 - To nearest Petrol/Benzin station, KM
How far to the Petrol station. e.g 2 - To nearest place to bath and swim, KM
How far to bathing and Swimming. e.g 2 - Where can the guest bath
Select the best alternative - To nearest place to fish
How far to a fishing spot.e.g 2 - Where can the guest fish
Select the best alternative - To nearest Ski tracks in KM
How far to ski.e.g 20 - To nearest Alpine Centre in KM
How far to ski.e.g 20 - The name of the nearest Alpine centre
State the name e.g.Sierra Nevada - To nearest Golf course in KM
How far to play golf.e.g 20 - The name of the nearest golf centre
State the name e.g.Kivik Golf - To nearest Airport in KM
How far to the Airport.e.g 50 - The name of the nearest Airport
State the name e.g.Kastrup
When completed the section click “Save” and the Details are completed, next step is Location

3c. LOCATION
NB: Some alternatives are marked with a red star “*”, this means that you must select one of the available alternatives or that you must state some information. the other fields are optional to state.

- Environment
Select the best alternative(s) - Location
Select the best alternative(s) - On island
Select the best alternative(s) - View
Select the best alternative(s)
When completed the section click “Save” and the Details are completed, next step is Room Allocation

3d. ROOM ALLOCATION
NB: The number of beds should match how many guests there can stay in the vacation object. When adding rooms in “Room Allocation” be sure to register all rooms that you have available even if they do not have a bed. Every room count!

Room Allocations
Start with register as many rooms you have e.g. 4 rooms. Click “Register Room” 4 times
Then select the type of rooms by selecting in the dropdown menu. Thereafter state how many beds of different types you have in each room.
1 Double bed = 2 persons
1 Dividable Double bed = 2 persons
1 Single bed = 1 person
If you create to many room, in the menu just select >Delete<

When completed the section click “Save” and the Details are completed, next step is Equipment

3e. EQUIPMENT


- Outdoor
Select the best alternative(s) - Kitchen
Select the best alternative(s) - Number of Dish washers
State how many there are e.g. 1 - Fridge in Liters
How big is the Fridge? e.g. 200 - Freezer in Liters
How big is the Freezer? e.g. 100 - Bathroom
Select the best alternative(s) - Number of showers
State how many there are e.g. 1 - Number of bath tubes
State how many there are e.g. 1 - Indoor equipment
Select the best alternative(s) - Sauna
Select the best alternative(s) - Laundry and Cleaning
Select the best alternative(s) - Number of Washing machines
State how many there are e.g. 1 - Number of Dryers
State how many there are e.g. 1
When completed the section click “Save” and the Details are completed, next step is Facilities

3d. FACILITIES

Facilities
All with RED star is a must, the other fields are optional to state.
- Antenna Ratio
Select the best alternative(s) - Internet
Select the best alternative(s) - TV Channels
Select the best alternative(s)
When completed the section click “Save” and the Details are completed, next step is Activities

3e. ACTIVITIES

- Sport & Adventures
Select the best alternative(s)
When completed the section click “Save” and the Details are completed, next step is to start to upload your pictures
Click “Continue” to go to next page

When you have added all information, got a green tickmark then please verify the informaiton.
You need to have all subsections marked with the green tickmark to being abble to continue to the next step of th eregistration process.
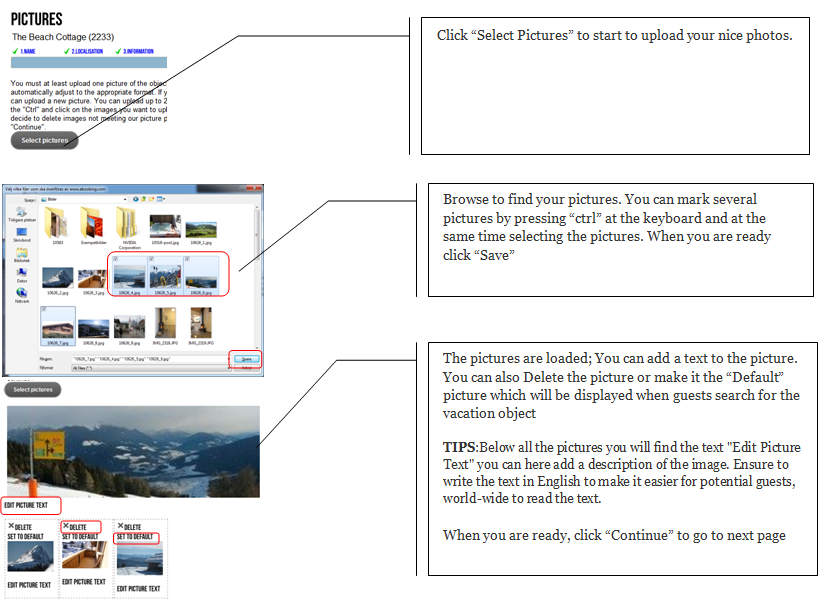
4. Pictures
Please note that pictures are one of the most important method to marketing your vacation property. Make the rooms cosy and nice before you take the pictures. You can have some nice flowers on the table, a sparkling fire in the fireplace and let the TV be turned on. Look at the pictures and take new ones if needed.
When adding pictures, please note that there is a limitation of 2MB/picture. If your digital camera takes very big pictures there is two ways of dealing with this.
1. Use the application PAINT which is a standard tool if you are working with a PC with Microsoft Windows. Select “Change Size” and save the picture with a new name.
2. Before taking the pictures with your camera set the size of pictures to 2MB or a pixelsize of 800 width x 600 height. That will make your picture a medium size image. There is however no height x width requirements for being able to upload the pictures.
3. Resize the picture with your imaging program that you normally get with the camera in form of a CDROM or a USB-key
NB: If you add or remove equipment from the vacation object, ensure that the pictures are up to date.
TIPS: You can also add videoes (link to YouTube) or PDF files with important information e.g. the blueprint
5. GUESTS & FEES
One of the key areas for rental of vacation objects is that you have a good and well thought out pricing strategy.

State how many persons who can sleep in the vacation property. In my example I stated 5 persons (incl. extra bed this value will be presented when the object is published. This should match the available beds which you stated in the ROOM ALLOCATION section. Thereafter click [SAVE] and the Standard Price List page is displayed.

Price strategy – Standard Price List
The first thing you must do is to create a standard price list.You do this by stating a DAILY RATE and a WEEKLY RATE. The purpose of the standard price list is to create a reference which can be used to adjust your seasons based on percentage of the standard price list, this is one of two methods. The standard price list will create a standard season which apply if you have not created your own specific seasons.
NB: First you need to state the number of guest who can stay in the vacation object.

Standard price list
The first thing you must do is to create a standard price list.You do this by stating a DAILY RATE and a WEEKLY RATE. The purpose of the standard price list is to create a reference which can be used to adjust your seasons based on percentage of the standard price list, this is one of two methods. The standard price list will create a standard season which apply if you have not created your own specific seasons.
NB: If you have not created an own defined season, the standard price list will apply.
Example:
DAILY RATE = 34€/day
WEEKLY RATE = 349€/week
Tip:
If you enter the standard price list rate to match your price in high season, then you can easily reduce the price during low seasons based on the desired percentage of standard price. You can always, when creating seasons specify either a percentage of the standard price, or directly enter a price. You can find more information at Seasons below.
Seasons
You can create as many seasons as you need. Each season can be defined with the minimum number of days for which you as the property owner want the guests to book i.e. Minimum of nights, you can select between minimum of 1 to 6 days. If you require the customers to book at least a week you select WEEK which is Saturday to Saturday.
If you select minimum number of days a guest can book the vacation object for 1-6 days, then you must state a DAILY FEE only. A Weekly fee cannot be set. If you select a week as the minimum days a guest can stay, then you must state a WEEKLY Fee. A Daily fee cannot be set.
Examples:
A.% – Based on the standard price list.
You can create a season by entering a percentage ratio related to the standard price list. Let’s say you set the default price list to DAILY RATE = 30€/night and you set WEEKLY RATE = 395€/week, you can then base your season on a percente ratio of the standard price. For example, if the season during Jan-March is a low season, you can when you create the season enter 50% of the DAILY or WEEKLY FEE (in this example, Standard pris list, Day = 30€/night, if you state 50% the daily fee will be 15€. Same will apply for week, the standard pris list, Week = 395€/week, if you state 50% the daily fee will be 197,5€/week)
NOTE: Be sure to enter a “%” sign after the figures, otherwise Abooking will interpret the figures as the price. If you enter 50, it will be 50€ – if you instead state 50%, this will be equivalent to 50% of the standard price.
B: Based on user-defined rates
You can also directly enter a price simply by entering the price, e.g. if Jan-March is a low season and you want to state a diffrent price than the standard price list you just state the fee. Day = 15, this corresponds to 15€/day, if you enter Week = 197.5, this corresponds to 197.5€/week.
Note: By entering a price by your own, the price for the season is “disconnected” to the standard price list. You can choose how you want to combine Percent ratio based on the standard price list and custom rates.

